Wilderness Emergency Sled Care
Cody Strathe
Everything breaks if you hit it hard enough and in the correct way…This most definitely applies to dogsleds. This I have learned as a dog musher and sled builder. Not all sleds are built to withstand the abuse of impact. I could go on forever about choosing a sled that is durable enough to withstand the abuse of the trail, but that is another article and even the most durably built dogsleds can and do break under the right circumstances. Take this past years Iditarod for example. A large percentage of dogsleds broke on the trail between Rainy Pass and Nikolai. Many sleds were completely trashed, the most durable sleds survived unscathed or with only a broken drag or brake bar to show. Mushers who planned ahead had materials on hand to repair their sled. Others had to use the resources they could find in their sled, on the trail, or at the checkpoints to limp on down the trail or make the difficult decision to scratch. At times like this it is important for mushers to carry a few supplies and tools to make a quick fix on the trail. In fact any musher on the trail at any time, training run, camping trip, anywhere that you aren’t able to limp right back home quickly, would be smart to carry a small repair kit. In this article, I will share what I carry in my repair kit and then go into some of the possible solutions for fixing sleds on the trail.

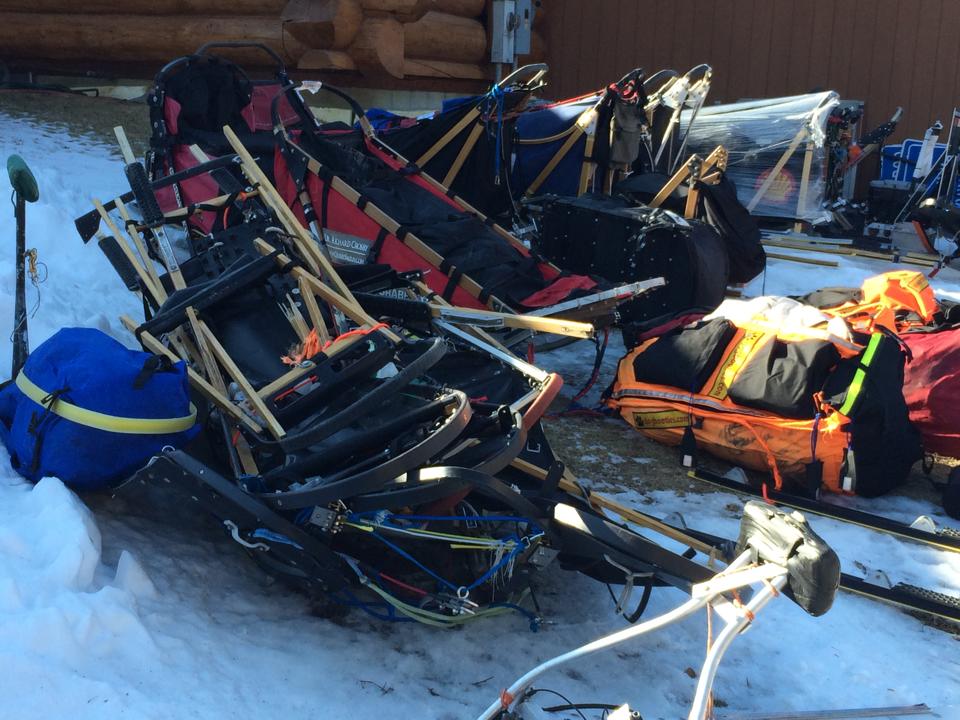
A pile of broken sleds from the 2014 Iditarod. Photo by Karen Ramstead.
Repair Kits
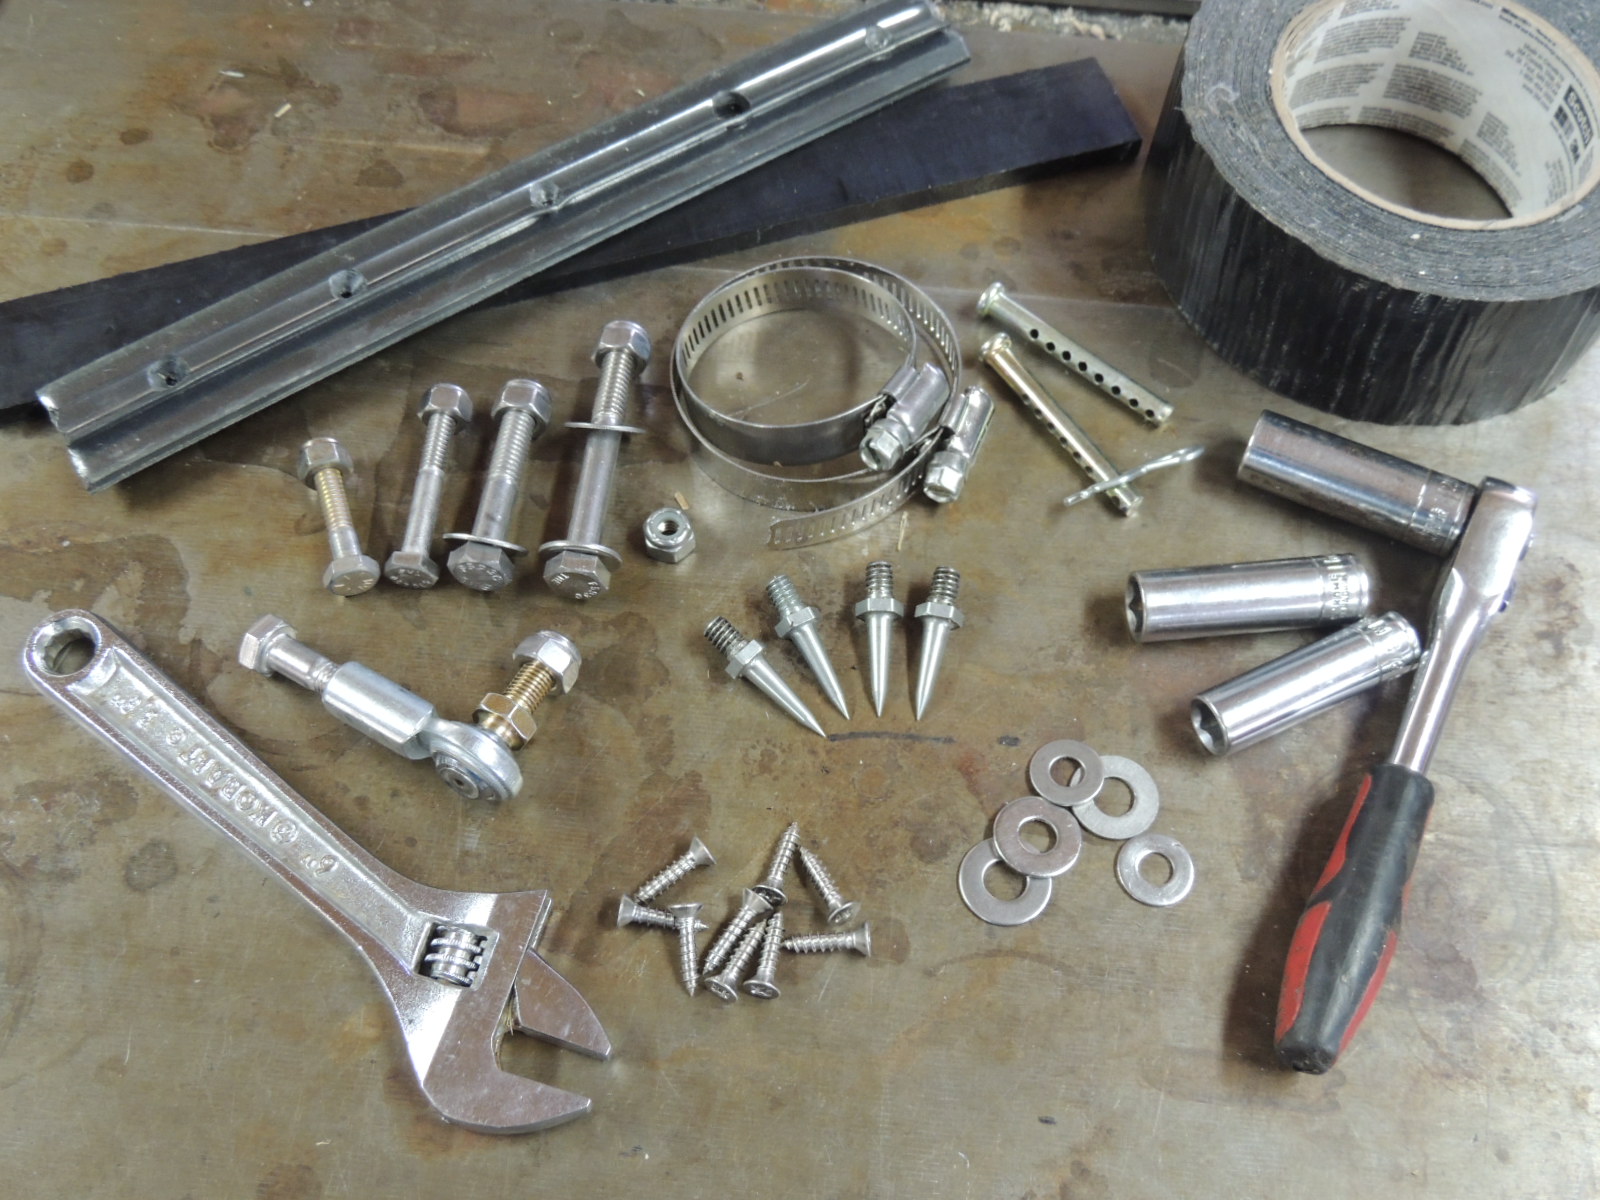
This photo is of a standard repair kit that I carry for one of my race sleds. Each sled has it’s own set of materials that will help fix it quickly. You need to decide what those are. First, you need to make sure you have the tools that fit the sled you have. If you have a sled with hex head bolts, you will want to make sure you have either a small crescent wrench or the correct size of wrench. Don’t forget that you need a wrench for both sides. I prefer to carry a little socket wrench so that it speeds up my project on the trail and cuts down on crabbiness for me and the dogs. I can also put a screw driver head on it and put screws into wood rather quickly. A Leatherman tool is a nice addition as it has pliers and screwdrivers built in, but I find it cumbersome for these applications and only use it if I have to. You will want to look closely at all of your hardware and make sure you have the proper tool for all important parts of the sled. Will you need an Allen wrench to get that fastener tightened? A flat-head screwdriver? Make sure you know what you need before you need it.

My typical race sled repair kit.
For spare hardware it is important to look closely at your sled. On the sleds that I build, I only use two diameters of bolts. I can then just bring a couple bolts of each diameter. You can usually get by with a bolt that is longer, but obviously not shorter, so make sure you have bolts long enough to do the longest job you might need. I also like to throw in some metal tapping screws that I can sink into runners, stanchions, whatever I need to screw together. It can be difficult to put screws in on the trail, but ask around at a checkpoint and it is common for there to be a cordless drill sitting around. If this is something you would like to be prepared to do, then you may want to put a small drill bit in your kit so that you can put pilot holes into sled parts for sinking screws. This would be mandatory if trying to sink screws into Aluminum runners.
I also make sure to have extra clevis and cotter pins in the kit. These are the usual way of keeping our runner plastic on to the runners. They often get ripped out when running sleds on bare ground and rock. If you have no pin, then you have no plastic. Bring extra pins. In these really rough conditions, I sometimes bolt my plastic in with a 1/4” diameter bolt it moves less when the plastic gets ripped around and tends to stay in better, however it takes longer to change your plastic because you need your tools… a trade off.
Brake tips, this one is simple and for some reason most people don’t have any along. I don’t know how many race starts I’ve been packing my sled when, I hear over my shoulder “Cody do you have any extra brake points? Mine are worn down to nothing.” In fact I do.. I’ve learned to carry extra for other people. On a trip with lots of bare ground and rock it is a great idea to have extras along. Stopping is nice. I sometimes carry a spare brake and brake bar depending on what the trail may be like. I heard of a few folks in Iditarod this year that their only sled casualty was a broken brake bar, it sounds like the trail was pretty scary without a brake. I heard of at least one musher that didn’t skimp and had an extra brake bar along. He sounded happy that he did.
If your sled has some random, weird part that you don’t know how to fix.. then bring one of them. On my newer sleds I have tie-rod end bearings built into the sled as flexible support members. If one of them breaks then my sled won’t function properly, so I carry an extra one in case. I’ve never had one break so far, but I want to be ready when I do.
Other things that I tend to carry are a couple thin long pieces of UHMW plastic with holes drilled in them for splinting purposes. I have also used pieces of runner plastic in a bind. It isn’t as strong and stiff, but you have it with you already. 3-4 metal hose clamps are useful splinting pieces together. I sometimes have a roll of bailing wire. If I have a lashed sled then I carry some type of lashing material. Dacron tuna leader works well. Then there is tape.. don’t underestimate the power of a good tape. Duct tape or House wrap tape is mandatory. If you are not familiar with house wrap tape, it is used to seal up vapor barrier and tyvek layers on houses.. House wrap tape is good as it sticks well at colder temperatures and it also works well for patching holes in sled bags, clothing etc. A full roll can be cumbersome, I usually roll it around something such as wrapping it around my matchstick holder or water bottle. I wrap a bunch around my ski pole shaft too. Tape everywhere just waiting to be used!
Wilderness Emergency Sled Care
So now that you have a kit full of stuff to carry, it is time to talk about some ways to use it all. Years ago I took a Wilderness Emergency Technician course. We spent everyday splinting and fixing each other with the resources we had at hand. Sometimes we had medical supplies and other times we had only what was in our packs. It was fun to come up with solutions and I am still fond of some of my elaborate splints made from parts of my backpack all duct taped to some poor EMT student. Sled repair on the trail uses the same idea. Use what you have to get it done quickly so you can limp your way out. I’ll go through different common failure points in the sled and possible solutions to fixing them.
Runners
Runners are one of the weakest points on the sled. It is no surprise since they are the part of the sled where the weight of the sled makes contact with the world. Sometimes that world is smooth soft snow, other times it is an unforgiving world. The runners flex and move constantly under the weight of your body and the load. The point where they come in contact with a non flexible connection such as a bracket is usually where they tend to crack and break. The front of the first bracket by the bend of the runners and the one right behind the back stanchion at the back of the sled are the most common points for runners to break. If you have a sled with laminate or wooden runners with QCR or screw on plastic, you can release the screws a bit so that you can slide hose clamps between the plastic and the runner. You can then use the pieces of plastic that you were carrying to splint it. If you don’t have plastic with you, then it is time to get creative. Find a tree that you can widdle down with your ax and splint it. Put two hose clamps on each side of the break point and put your splinting material on both sides and possibly on top. That should limp you in. If you have the patience to put screws in through your splinting material it will stiffen it up and make a stronger fix.
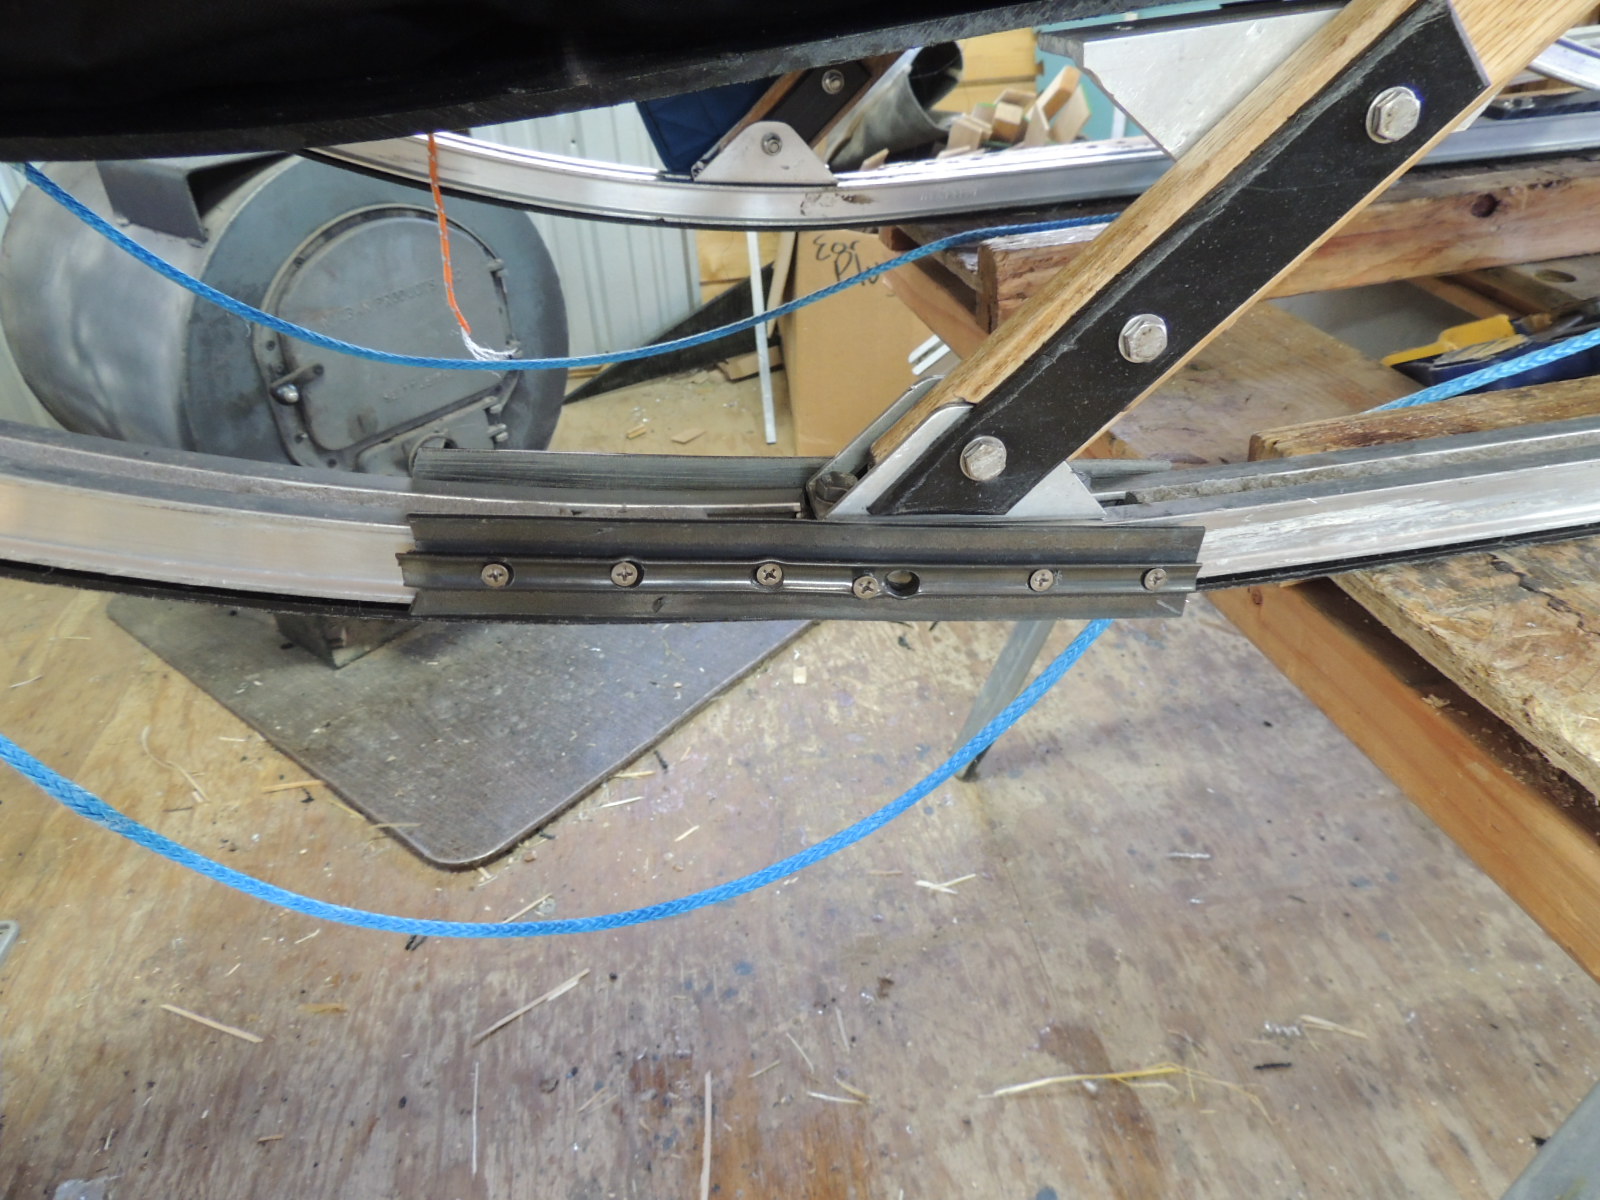
Aluminum runners are more difficult to deal with. I reccomend that you buy a sled with a preventative runner insert at critical points.This sleeve not only protects the runner from breaking, but in the event that it does break, it is already splinted together. However, if you don’t have a sled with that safety system, you will need to try to splint it. It can be very difficult as there is no good way to wrap around the runner due to how the plastic slides into the groove. If there is space on top and you are not directly against a bracket such as shown in the photo. You can slide a piece of runner plastic into the top of the runner to use as a top splint. You can then use some type of splinting material, in the picture this person just used what they had which was a couple chunks of runner plastic. Make sure you do this close to a checkpoint.. for an aluminum runner you will need an electric drill in order to put pilot holes into the aluminum before screwing on the splinting material. On an expedition, you can carry an old style hand powered drill. On the trail without a drill you may be able to wrap the joint and splinting material with a house wrap tape, wrapping completely around your runner including the runner plastic. The surface of the house wrap tape is relatively smooth and it should still allow some glide to occur although it will not be as nice as before. It should get you in though and that is what is important.

Creating a splint on an aluminum runner with scraps of runner plastic and screws
Composite laminate runners such as the carbon/kevlar/ash runners I build are very easy to splint. The outer composite fabrics help to splint and hold the broken core together. One can sink screws easily into this material and make a pretty solid runner again to get down the trail on. The carbon kevlar runner on one of our sleds broke on the Cargo flight back from Nome last year. I jimmied up a splint with scraps of UHMW and screwed the heck out of it. I ran the rest of the spring with it. Then we got on snow in November and whoops, never had fixed the runner oh well, kept running… 2000 miles later, I realized I was running the Copper Basin 300 on a splinted sled. A week later I decided to switch out the runners before starting the Yukon Quest. Maybe that wasn’t so smart, but if you splint it good, it should get you a ways down the trail.
Stanchions
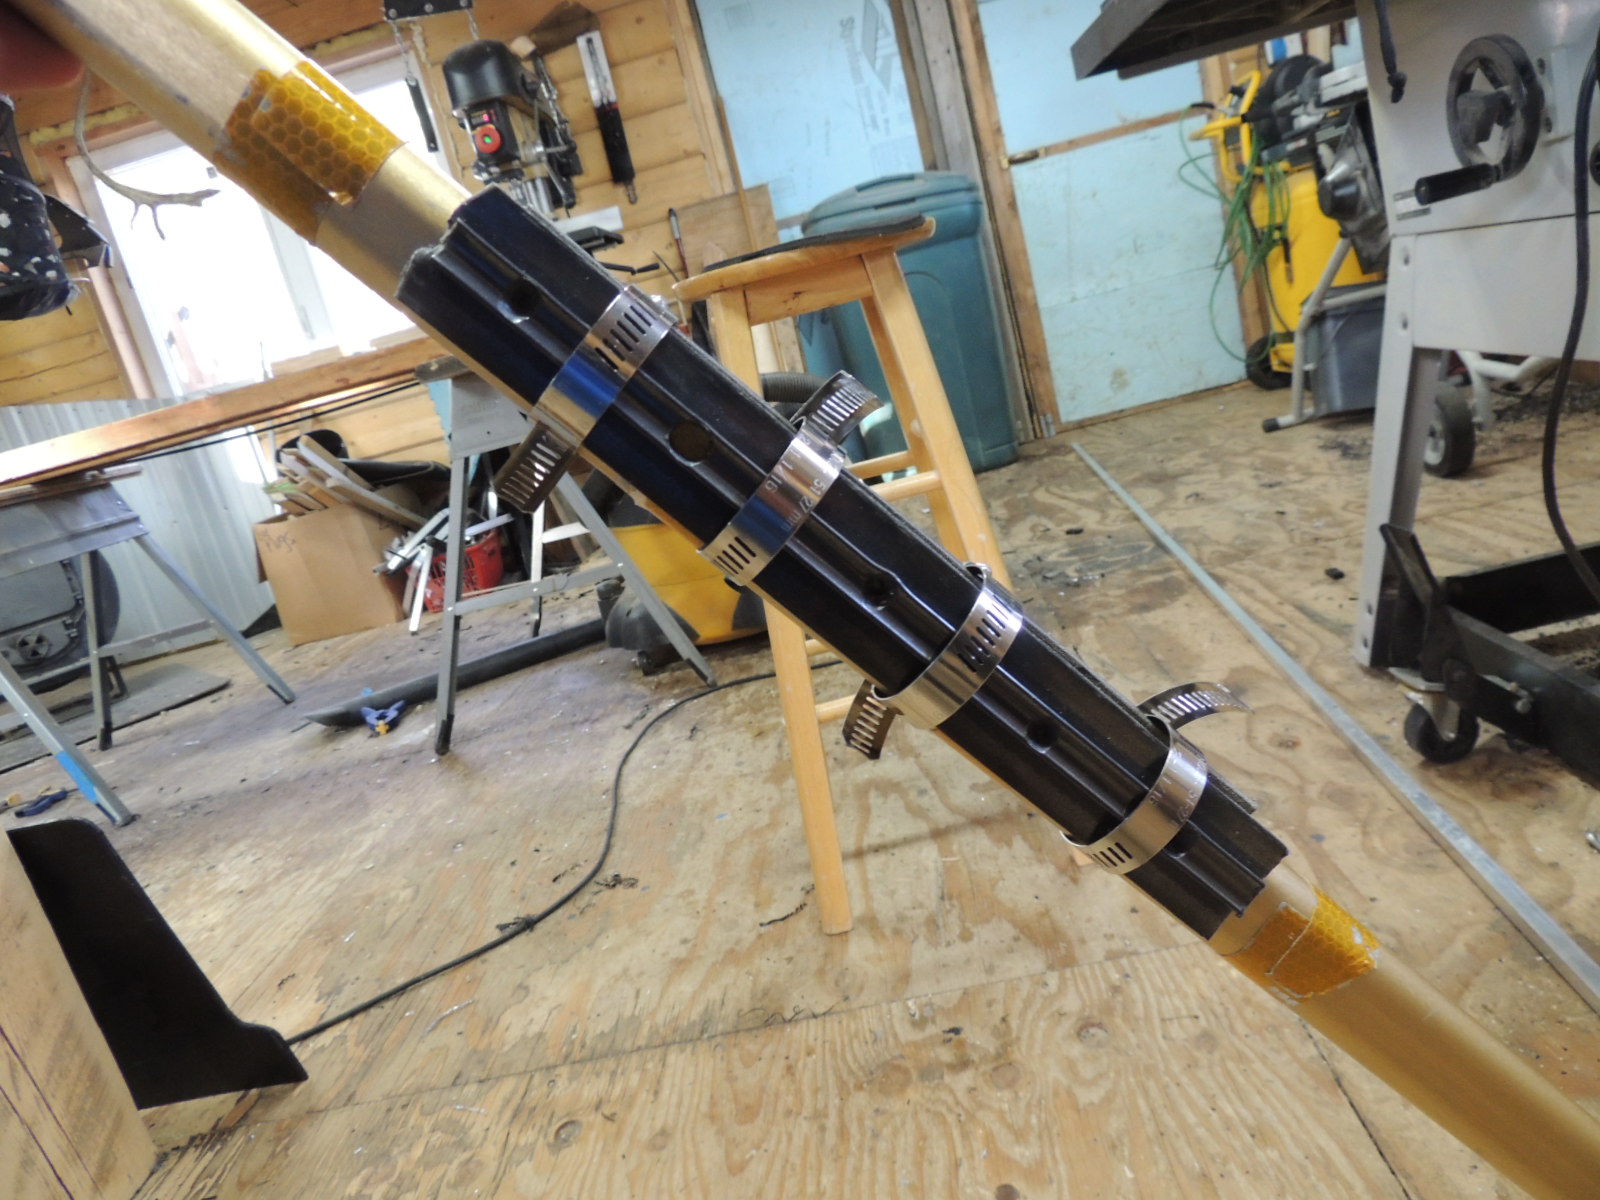
Stanchions take a beating and not all stanchions are designed to taking a beating. Hollow aluminum and carbon fiber stanchions are designed to be as strong as possible while being light as possible… not designed to take direct blows. Single piece wood stanchions are only as strong their grain pattern allows and the wrong grain pattern can be very weak on impact. Laminated wood and especially those with composite laminates are very strong at the trade off of weighing twice as much or more than hollow stanchions. Once again, they all break at some point. Wood stanchions, like the runners are the easiest to fix as we can just sink screws and nails into them. Use your plastic pieces, wittle a tree, use your ski pole, grab some trail markers, whatever you got and either hose clamp them, screw them or tape the heck out of them.. you are splinted.

Splinting a stanchion
Hollow carbon fiber and aluminum stanchions can be a different story depending how they break. Many times aluminum will bend or dent, it is not usually a good idea to bend it back as the aluminum is now brittle and will usually crack and break when bending back to a normal position. If it completely broken it is often bent up funny at the break point. This is because aluminum is a very soft metal and sometimes in the process of bending and then breaking the alumium pulls apart as if pulling a piece of warm cheese apart. leaving the edges stretched and ripped. I don’t ride aluminum stanchioned sleds due to these breaking characteristics, but I do use hollow carbon fiber which is very similar. Carbon fiber will not stay bent on impact it either springs back or splinters like an old fiberglass fishing rod. In either case I recommend having a long plug, about a foot long that is the correct size to fit inside the broken stanchion snuggly. If you look at the ends of your hollow stanchioned sleds, you’ll notice that there are plugs made from UHMW or wood in the stanchion where bolts go through them. This makes them stronger and keeps them from getting crushed by the fasteners. If you can slide one of these into the stanchion at the break point and then splint around the outside you will have a very strong fix. This can be difficult if your stanchion is splintered or bent funny at the end. You can always use your pack saw or leatherman saw to clean up the ends first.
Brakes and Drags
It is often that we catch a drag or our brake on a stump and voila! It is gone. I recently was out on a run with my handler when she yelled to me that her brake bar was broken. I took a look and the hole in the aluminum brake bar had worn out on the 8 year old sled and the brake bar was dangling from one side. Of course we were only 1 mile from home at the start of a long run and the teams weren’t really looking to chill out while we figured out how to fix it. I surveyed the resources at hand and grabbed an iron rope tugline from her sled. I tied it around the vertical brake spike on that side, then wrapped it around the brake bar several times back in the direction of the last stanchion of the sled where the brake bar normally connects. I then tied that end off right there. The brake bar was now held in it’s proper position and worked good enough to go and do a 40 mile run. The same technique has been done with dragmats.
Plastic Parts (sled beds, driving bows, brushbows, etc)
UHMW plastic is used for sleds because it is very tough stuff and is perfect for bouncing off trees and rocks. The exception to this is when you have a ten year old sled that has set out in the sun for half of it’s life. The older UHMW didn’t have great UV protection and breaks down and becomes brittle over time. If you are driving a sled that has little crack lines on the brushbow, handlebar, or anywhere there is a plastic part.. it is waiting for a nice little impact to break right along those crack lines.. change it before you hit something. Once this cracked and weak plastic breaks it is very hard to do anything with. I have seen sled beds that just turned into spider webs of broken cracks on slight impacts. I’ve seen triangle shaped brushbows that have exploded on impact with trees instead of bouncing the sled off them. In these cases you will just have to come up with some type of splinting genius with the resources you have.You can splint a handebar with a piece of runner plastic if needed. I have had brushbows and handlebars come in to be fixed with all sorts of crazy things done to them.. tape of course.. chunks of garden hose slide over the broken ends and hose clamped to create wiggly splint, where there is a will there is a way. Limp on in and when you get home, change out those parts!